Summary
This guide will show you how to create beautiful color images using free online software.
Instructions
We’re all familiar with the breathtaking, colorful images of the cosmos captured by famous telescopes such as the Hubble Space Telescope, they’re used in magazines, on advertisements, album covers and T-shirts. However, these images, like all astronomical photographs, are originally collected in black and white.
The color images are created by combining three separate black and white images; one taken with a green filter, one with a blue filter and one with a red filter. Red, green and blue are three primary colors that can simulate a full spectrum of visible light to the human eye.
This guide will show you how to use a free web application to create beautiful color images from the observations you collected using the LCO robotic telescope network.
1. To begin you’re going to need three images of your object; one taken with a red filter (R), one taken with a green filter (V) and one taken with a blue filter (B). You can use observations you have taken yourself, or images from the LCO data archive. A selection of objects can be found in the table below. Click on the object name to access the observations.
1a. Or if you are a member of a Global Sky Partner you can observe and download your own observations with LCO,
2. Once you have your observations, go the Pixlr e editor (not Pixlr x editor)
3. If you saved your file select Open image from computer, otherwise select Open image from URL
4. When your image is open the first thing we want to do is ensure the highest quality by maximising the levels. You only need to do this if you picture looks a little grey or blurred. Go to Adjustment > Levels…
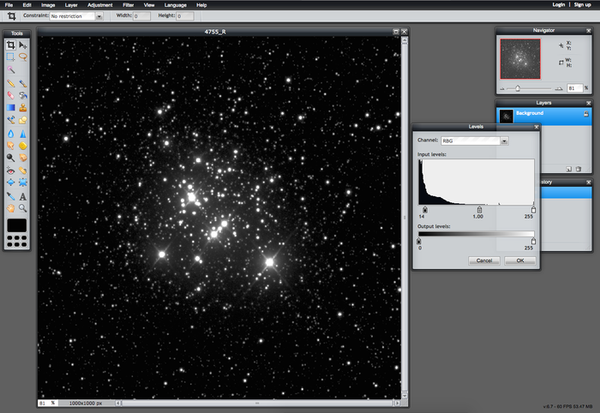
5. The aim is to use the sliders to make the background sky as dark as possible without losing any of the detail from your image.
6. Make a note of the final numbers because you will need to make sure all your images have the same settings.
7. Next we get to color our first image! Go to Adjustment > Hue & Saturation
8. Use the table below to find the Hue you’ll enter here for each image.
|
|
Hue
|
|
Red
|
200
|
|
Green
|
-70
|
|
Blue
|
70
|
9. When you’ve added the Hue tick the colorize box to check you have the correct colour.
10. You can probably keep the Saturation and Lightness values at 0, but feel free to play around with these. Again, make sure that the background sky is kept as black as possible and note down these values as you will need to use the same values for the blue and green images.
11. When you’re happy click OK.
12. Go to Layer > Open image as layer OR Layer > Open image URL as layer and open the green filter image.
13. Now we want to follow the same steps for the green and blue images, using the Hue values shown in the table above.
14. Once you have completed all three layers, you are almost finished! You will see a layers box to the right of the page. Click to select the blue layer.
15. Select the slider option 
16. An option to alter the Opacity and Mode will now appear. Change the Mode to Screen
17. Select the green layer and repeat.
18. You should now have a colour image!
19. You may have to make a couple of final adjustments for a perfect image, however. If your images are slightly misaligned this can be fixed by simply selecting 
20. You can use the option to move the highlighted layer. Begin with by unticking the box on the layer you are not working with, this will make that layer temporarily invisible.
21. Now move the layer until it aligns as well as possible with the red layer below. Zoom in using  for a more accurate result. Congratulations, you just created beautiful full colour astronomical images to share with your class!


