This guide will show you how to create beautiful color images using free software that can be downloaded from the Internet.
We’re all familiar with the breath-taking, colorful images of the cosmos captured by famous telescopes; they’re used in magazines, on advertisements, album covers and T-shirts. However, these images, like all astronomical photographs, are originally black and white.
Color images of space are created by combining three separate black and white observations; one taken with a green filter, one with a blue filter and one with a red filter. Red, green and blue are three primary colors that can simulate a full spectrum of visible light to the human eye.
Don’t be intimidated, the process is easier than you might imagine and should only take you around 20-minutes!
Downloading your observations
1. The first thing you need to do is download your observations from the observation portal, or you can use observations from the LCO data archive. A selection of objects can be found in the table below, simply click on the object name to access the observations and download the three FITS files. Name them by their filter color (this will becomes helpful later on).
- If you're using the observation portal, you can search for a specific object using the filter list button.
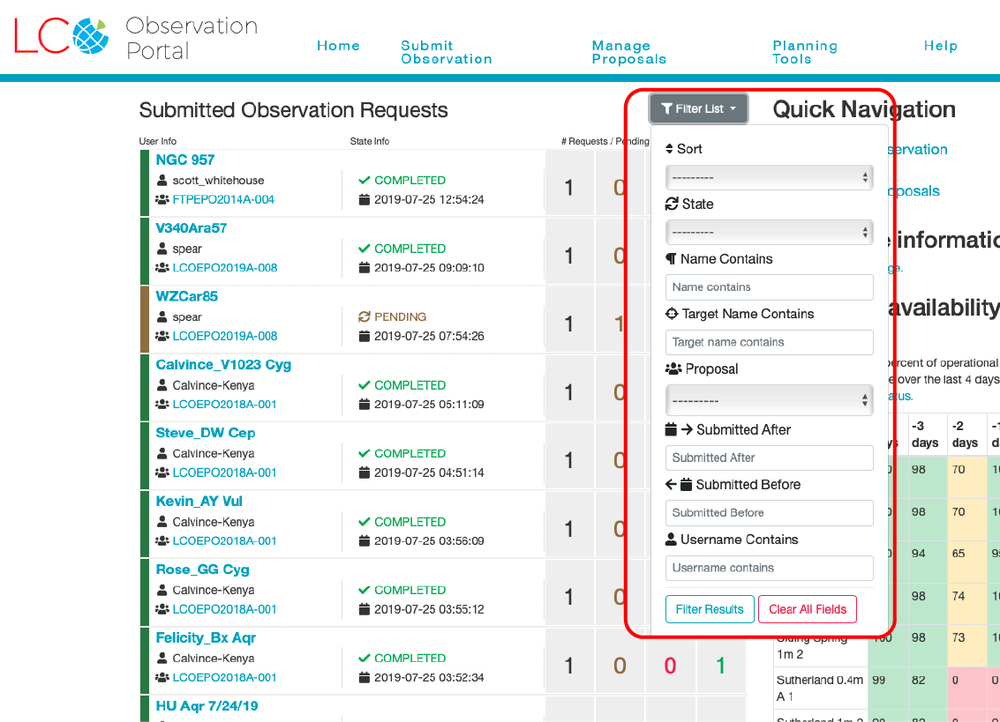
Once you've selected an object, download the files for all three filters.
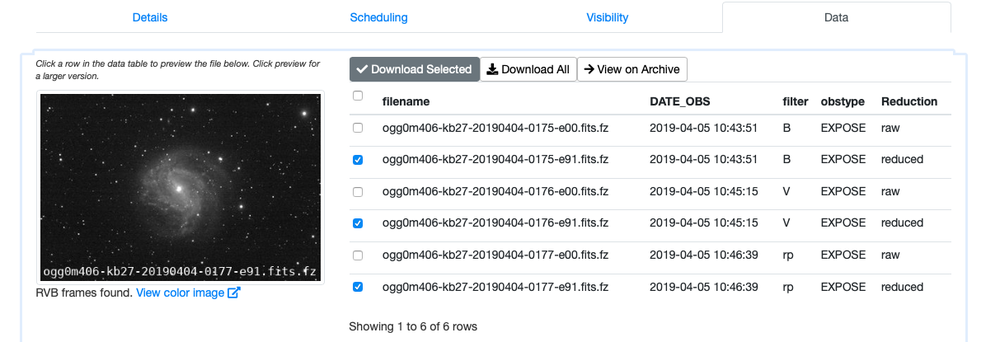
Note: Make sure when you name the file that you include the filter used for each image. This will make it much easier when you come to edit the images later on. You can find name of the filter in the 3rd column of the table.
FITS Files
Observations produced by the LCO telescopes will be available to you as a special type of file known as Flexible Image Transport System or FITS files.
FITS files are more than just image files, at the start of every FITS file is a header section, which contains important information about the image, such as the number of pixels, the date the image was taken, the telescope it was taken with, the exposure time and much more.
You will need to install special software to view and edit your FITS files. Examples of free FITS editing software available on the internet include SAO DS9 and FITS Liberator.
Note: For this activity we recommend FITS Liberator.
GIMP Image Editing Software
GIMP is image editing software that can be downloaded for free from the Internet and used on Mac or Windows computers. With GIMP you can add the colors back to observations taken with a blue, green and red filter and then combine the three images to produce a full color image.
Download GIMP for free from the GIMP website.
Note: Observations made using a green filter will be called Visual or ‘V’.
Preparing your Images
Before opening GIMP, you need to prepare your images so you achieve the best quality possible.
6. Begin by launching your FITS editing software (e.g. FITS Liberator) and open your three FITS files by going to File > Open.
- Set the white and black level sliders in the histogram graph to give a good amount of contrast without too much black or too much saturation.
- You can experiment with the different Stretch functions to enhance fainter parts of the image. Different stretch functions produce different results with each image so play around and see what works.
You’re aiming to make the background as black as possible while maintaining the detail of the object in the image.

3. When you are happy with the way the image looks, tick the 8-bit button and save your file. This is an important step, it will allow you to save your colored image as a JPG file when it’s finished.
4. Open the next image into FITS Liberator and repeat until all three images are edited, making sure you use approximately the same settings for each of your three images.
Adding Color to your Images
- The next stage is to begin to add some color into these images. To do this launch GIMP, open one of the color images and go to: Image>Mode>RGB Color. Do the same for each image.
- When all three images are open, select the red image. Go to Colors > Colorize
- This will open a window with three sections. First, tick the Preview button in the lower-right corner. Now enter the values in the table below for each of the filters.

4. Leaving Hue alone, you can now adjust Saturation and Brightness until you have a high contrast, crisp image.
You should now have three colored images.

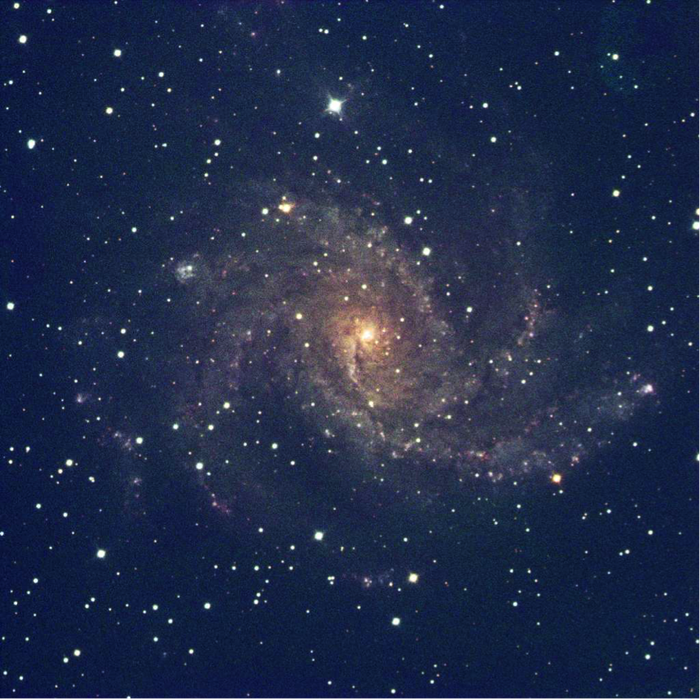
(example image of NGC 6946 before and after coloring)
Combining the Images
Now that the images are colored, they need to be combined into a single image. To do this, you copy and paste the green and blue images on top of the red image.
- Select your green image, and go to Select > All then Edit > Copy. Select your red image, and select Edit > Paste. Now, follow the same process with your blue image. You now have one image that combines the red, green and blue images.
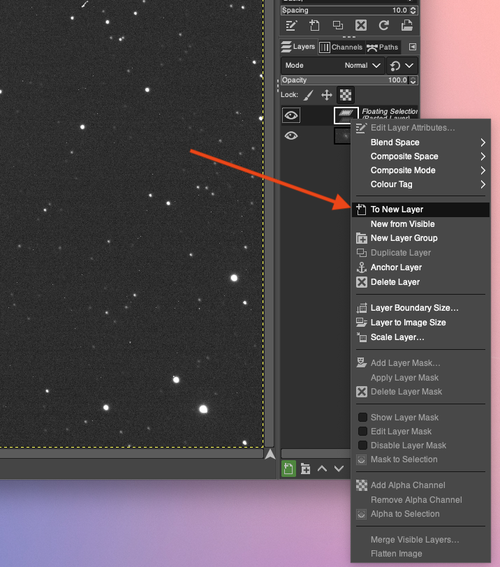
2. You should see a Layers window to the right of your screen. If you do not, go to Windows > Dockable Dialogs > Layers. This window shows that new layers have been added to the red image. Change the layer names if you wish.
3. The next step is to blend the images so the colors mix, and don’t just mask each other.
4. Above the list of layers in the Layers window, there is a drop down menu. Select Normal. This controls the mixing mode of the layers.
5. Highlight the blue image in the Layers window to select it. Then change the mode from Normal to Screen. You may also want to try other presets here, especially Lighten, or Linear Dodge.
6. Next, select the green layer and change the mode to Screen or Lighten or Linear Dodge, etc. This blends all the layers, leaving you with one full-color imaged.
7. To save your full-color image, go to File > Export as, and then select png or jpeg in the file type options at the bottom of the window.
Congratulations, you have made your own colored astronomical image!
